A Rainy Afternoon at the Drawing Table
A rainy afternoon drawing plan turns one familiar object into an easy, repeatable session, with a clear way to pause and return without starting over.
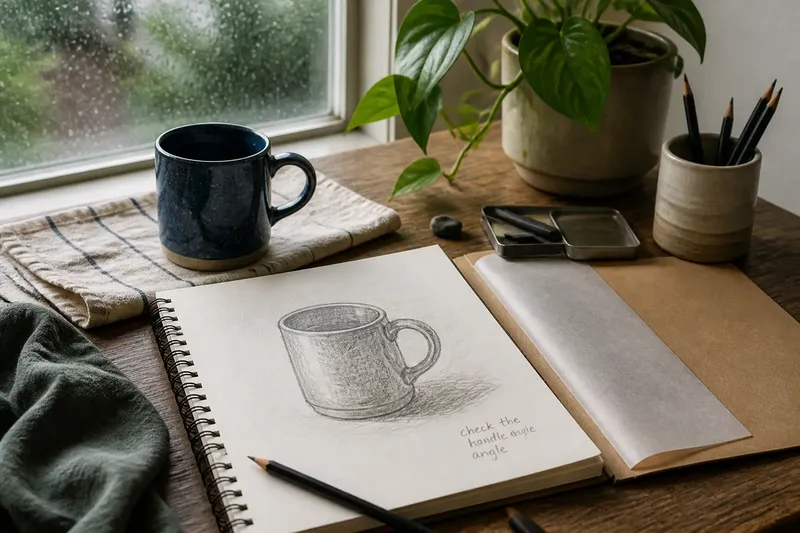
A rainy afternoon drawing plan works best when one small subject stays on the table and the session has a natural stopping point. Choose something already in the room—a pear, a mug, a houseplant leaf or a key—and leave the drawing ready for another visit rather than treating the afternoon as a test of skill.
The point is to make returning easy. Set up a modest space, draw for a short spell, and leave the tools and subject in a state that invites you back.
One subject, many decisions
A single object gives the eye something manageable to investigate. It also keeps the table from filling with props before you make a mark. Pick an item with a readable outline and a few details, but avoid a subject that asks you to solve several unrelated things at once.
A plain mug offers a rim, a body and a handle; a folded scarf makes overlapping edges; a small potted plant has a clear container and a cluster of leaves. If you choose a fruit, its uneven contour can be more interesting than a smooth sphere. The subject need not be beautiful. It should be easy to leave in place and recognise when you return.
Place it where you can see it without twisting your neck, and keep the background uncomplicated. A light-coloured object against a darker wall, or a dark mug on a pale cloth, makes the boundary easier to follow. A sheet of plain paper or a cleared corner of the table may be enough for a backdrop.
Decide what counts as the subject before starting. For a mug, that might mean drawing the vessel and handle, not the saucer, spoon, tea and window behind it. Narrowing the frame keeps the first look from turning into a list of obligations.
A short session with shape
Start with the broad silhouette rather than the smallest details. Notice the object’s highest and widest points, then mark a few light lines to place its overall shape on the page. Check the gaps around it as well as its outline: the space inside a handle or between two leaves can reveal an angle that is hard to judge by looking at the object alone.
Use an ordinary pencil and paper if they are nearby. A soft pencil line can be adjusted, but avoid rubbing every uncertain mark away. A faint guide gives you something to compare with the subject; a page scrubbed smooth offers little to build on.
Once the main shape feels placed, choose one feature to observe more closely. It might be the curve where a mug meets its handle, the crease in a folded cloth or the way one leaf overlaps another. Draw that feature in relation to the larger form. Details make more sense when they attach to a shape that is already there.
Pause and look from the page back to the object. Ask whether the drawing is too tall, too wide or tilted compared with what is in front of you. Make one adjustment if you see a clear difference. You do not have to correct every discrepancy or add shading merely because a blank area remains.
Let the session end while there is still a clear next move. That might be adding the shadow beneath the object, checking the handle’s curve or drawing a second leaf. A useful stopping point leaves the work with a visible direction for the next visit.
Make the pause welcoming
Where you leave the drawing matters as much as the first few marks. Keep the paper flat and away from drinks, crumbs and damp sleeves. If the table must be cleared, slide the sheet into a folder or place a clean sheet over it; avoid folding a page with graphite or charcoal on it, since the marks can transfer.
Leave a small note beside the drawing, or write lightly in a margin, describing the next thing to look at: “check the handle angle” or “find the darkest shadow”. This is more useful than a vague instruction to improve the picture. When you return, look at the object again and decide whether the note still makes sense.
Keep the subject in its original spot if it is safe and practical. If it must be moved, take a quick look at its orientation before shifting it, or leave a simple indication of where it stood. A plant may turn towards the window, a mug may be picked up, and a scarf may be folded away. The aim is not to freeze the room, but to make changes visible enough for you to choose whether to redraw from the new arrangement.
For a subject that cannot stay on the table, such as a piece of fruit someone may eat, make a brief note of its position or draw a tiny outline before clearing the space. There is no need to photograph everything; a small reminder is often enough to resume without rebuilding the whole scene from memory.
Questions about rainy afternoon drawing
What should I draw on a wet afternoon?
Choose an object with a clear outline that can sit safely where you can see it, such as a mug, a pear or a small plant. A familiar object makes it easier to notice its width, angle and shadow without spending the session deciding what belongs in the picture.
How long should a drawing session last?
Stop after a manageable spell, while you can still name one next action. There is no required duration; the useful measure is whether you can leave the page in a state that feels easy to resume.
How do I keep my place in a drawing?
Leave the page flat or protected in a folder, and make a short note about the next feature to check. If the object has to move, note its position or accept the new arrangement as the starting point next time.
Do I need special drawing supplies?
No elaborate kit is needed for a small subject: paper, a pencil and a clean place to work are a sensible start. If you use charcoal, ink or another material, follow its label and maker’s handling guidance.
Return without restarting
When you come back, resist the urge to begin again on a fresh sheet just because the first drawing looks uneven. Put the subject back into view and compare its broad shape with the page. Then follow the note you left, or choose a new small question if the scene has changed.
Say you have drawn a blue mug, lightly sketched its oval rim and left “check the handle” in the margin. On your next visit, you notice that the handle leans farther out than you drew it. Adjust that line and add the shadow beneath the base; the handle will be more clearly placed, and the mug will feel more firmly set on the table, even if the picture remains unfinished.
It is also fine to decide that the drawing has said enough. If the outline captures what interested you, leave it as it is and put the pencil away. Keep the page, recycle it or use the reverse for another subject; none of those choices needs to be justified by a polished result.
What is not worth the effort is building an elaborate still life, searching for perfect light or buying a set of supplies before you begin. Those preparations can consume the quiet interval the drawing was meant to fill. Start with the object at hand, make a few attentive marks and leave the table ready for another visit.
A rainy afternoon drawing plan is most useful when it fits around the room rather than taking it over. Choose one object, leave a clear next move and protect the page from everyday clutter. The next time you pass the table, you can return to the drawing or leave it unfinished without making the afternoon feel wasted.